Your First Game in Unity: Ghost Evader: Part 07: Enemy Spawner
Hey everyone, welcome to the next step in the setup for our game, Ghost Evader. This is a simple 2D top-down game where the player must collect coins and stay alive as long as possible. In this series we are going to go step by step and explain everything as clearly as we can.
In this post we are going to set up the enemy spawning logic.
Enemy Spawner Design
Our design for our spawner will be straightforward. We construct a timer, for example, one enemy per second, spawn it, go on the next.
In this case we know this delay will happen over multiple frames.
We could create a countdown in Update() like we did for the enemy’s change of direction. We’re going to use a new method for executing behavior on a timer, a special feature of Unity called coroutines.
A Unity coroutine is a special method that can pause its execution (yield) and return control to Unity, allowing tasks to be spread across multiple frames. Unlike regular methods that execute completely within a single frame, coroutines are perfect for handling time-dependent logic (like fade-out animations, countdown timers) or waiting for asynchronous operations (like downloading files or loading scenes) without freezing the game.
Prefabs
Let’s create a new script called ObjectSpawner.cs. It is going to have one job, spawn enemies. When we later get around to creating coin pickups, the behavior is going to be exactly the same. We don’t need to have duplicated code to perform the exact same functions. This is why I am not calling it EnemySpawner so we can reuse the script to spawn coin pickups.
using UnityEngine;

public class ObjectSpawner : MonoBehaviour
{

}
Since our enemies will be spawned dynamically, we need a way to do this. Unity provides a way to save a game object so it can be created dynamically, called prefabs. To create a prefab in Unity, you can take a game object that exists in the Scene and save it to disk.
Let’s create a folder in your project assets and call it Prefabs, we’ll place our prefabs there.
So let’s take our enemy, drag it to our Prefabs folder. Unity will then turn that object into a prefab we can spawn.
Setting up the Internal Fields
First, we need a reference to the prefab we just created and a variable to indicate the time in between spawns:
 [SerializeField] private GameObject prefab;
 [SerializeField] private float timeBetweenSpawns = 1f;
We also need to know where to spawn the enemies. So we’re going to create a list of locations the code can pick from. C# supports what are called lists and arrays. They perform essentially the same function, they maintain a list of items. Generally we use arrays for a fixed list that does not change over time and a List for scenarios where we need to dynamically add and remove items.
For our game the list is never going to change during the game, so we will use an array like this :
[SerializeField] private Transform[] spawnPointArray;The [] symbol tells C# that this is an array. By using [SerializeField] Unity will initialize an empty array for us so we can configure it in the inspector. Otherwise, we need to write our own code to initialize and set the items of the array.
Next, I am going to set up two special variables like this:
private bool _isRunning;
private Coroutine _spawningRoutine;
The bool variable type is a variable that marks whether it is true or false. When the game starts, this will automatically be set to false, or we can set it ourselves.
The Coroutine variable type tells C# and Unity that we want to hold a reference to a Unity Coroutine function. More on that later.
Writing the Coroutine
This is our Coroutine function
private IEnumerator SpawnObjects()
{
    WaitForSeconds delay = new WaitForSeconds(timeBetweenSpawns);

    while (_isRunning)
    {
        int spawnIndex = Random.Range(0, spawnPointArray.Length);
        Instantiate(prefab, spawnPointArray[spawnIndex].position, Quaternion.identity);
        yield return delay;
    }
}
The IEnumerator return is a special Unity type that tells Unity that this function is a Coroutine. Otherwise, will treat the contents as a normal function.
While Loops
This looks a little complex, let’s walk through this.
WaitForSeconds delay = new WaitForSeconds(timeBetweenSpawns);This is a new variable type, WaitForSeconds holds the value the coroutine is using for its timing.
We create the variable by calling WaitForSeconds(timeBetweenSpawns). This translates the time we want in seconds into something the coroutine can work with
while (_isRunning)
{
    // Do stuff
}
This is called a while loop. A while loop will execute everything inside the curly braces if the expression inside the parenthesis is true. It will start over and continue to execute endlessly as long as the contents are true.
Important Make sure you understand the expression and if/when it changes to be false. You can have this code executed forever.
In this case it is based on _isRunning. We’re going to set this to true when starting the coroutine. Setting it to false at any time will stop the while loop and case the coroutine to end.
Array Indexes
Looking inside the while loop:
int spawnIndex = Random.Range(0, spawnPointArray.Length);
Instantiate(prefab, spawnPointArray[spawnIndex].position, Quaternion.identity);
yield return delay;
This looks equally complex, the instruction int spawnIndex = Random.Range(0, spawnPointArray.Length); sets up an integer value that picks randomly from the items in the spawnPointArray.
The variable int spawnIndex is an integer or whole number without a fraction. This represents what item in the array we are interested in. The array numbering always starts at zero.
For example, the first item is at position zero. The last item will always be at a position one less the maximum. For example, in a ten-item array the first item is at position zero, the last item is at position nine.
If you try to use a position(index) outside of this, you will crash your program.
Next, Unity has a function for choosing a random number Random.Range(0, numberOfItems). If numberOfItems is an integer, as in the case of an array index, numberOfItems will represent one less than the number passed. We pass the array length which contains the number of items in the array. This is so this function can work with arrays without issue.
Unity Instantiate
The next line creates the game object :
Instantiate(prefab, spawnPointArray[spawnIndex].position, Quaternion.identity);This is a Unity function that does the work. We pass it the game object, the position in the game scene, and the rotation we want. The symbol Quaternion.identity tells Unity we want the rotation the object was saved with.
The Yield Instruction.
The key part of a Unity coroutine is the yield instruction. You can have as many yield statements as you need. This way you can have a multistep coroutine.
yield return delay;The delay variable is the WaitForSeconds type that tells Unity to pause execution and come back immediately following the yield statement, if there is one.
If this is the last line of the while loop, which it is, then Unity will go back to the top of the while loop and check the _isRunning variable.
Common Yield Instructions
Unity uses the yield return statement to know exactly when to resume the coroutine:
yield return null;Pauses and resumes on the next frame (excellent for continuous frame-by-frame loops).yield return new WaitForSeconds(time);Pauses for a specific duration of in-game time (affected by Time.timeScale).yield return new WaitForSecondsRealtime(time);Pauses for actual real-world time (ignores Time.timeScale, great for pause menus).yield return StartCoroutine(AnotherRoutine());Pauses until another coroutine finishes.yield break;Stops the coroutine immediately from the inside (works like a return statement for coroutines).
Important Note for Coroutines
For those who are more advanced, Coroutines are NOT multithreaded. They run synchronously on the main thread alongside your other script code.
Starting the Spawner
The code for this is fairly straightforward, I will just explain saving the coroutine reference.
private void StartSpawner()
{
    // Stop any existing instance first to prevent overlapping bugs
    if (_spawningRoutine != null)
    {
        StopCoroutine(_spawningRoutine);
    }


    _isRunning = true;
    _spawningRoutine = StartCoroutine(SpawnEnemies());
}
Much of this looks straight-forward you may notice this:
_spawningRoutine = StartCoroutine(SpawnEnemies());I am saving the coroutine reference itself to a variable. This is useful to cut down on string-based function references, especially when checking the function execution or stopping.
Now we just need a way to start the spawner. In a future post we will call the StartSpawner function from our game manager, but for now we will add a call to start it from Start()
private void Start()
{
    StartSpawner();
}
Stoping the Spawner
There will be times you will need to stop the spawner. In our design the spawner needs to stop in between rounds or when the game ends. So we need a way to manually stop it:
private  void StopSpawner()
{
    // Changing this will stop the coroutine
    _isRunning = false;

    // This is not needed, use if you hard code the spawning to always be true, you may need to check that _spawningRoutine is not null
    // StopCoroutine(_spawningRoutine);
}
Testing
You should now be able to test the game. For this demo I am temporarily set the _isRunning variable as a [SerializeField] so we can toggle it off to make sure it stops spawning.
You will need to set up empty game objects to act as spawn points. Create a few and spread them around the scene.
Your Spawner object should look something like this:
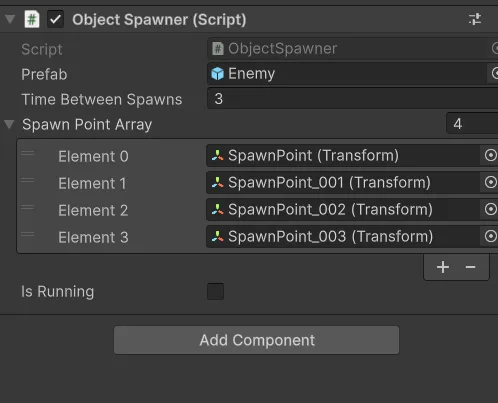
You should now be able to run the game and test it out. Enemies should spawn and unchecking the _isRunning should stop spawning. Since we only call StartSpawner() in the Start() we can’t use the checkbox to toggle it back on.
Conclusion
We now have a working SpawnManager and we can now spawn an endless hoard of enemies.
That said, we’re ready to start our GameManager and introduce player death!