Your First Game in Unity: Ghost Evader: Part 01: Introduction
When you are a first-time game developer, picking that first project can be an overwhelming task. If you search for tutorials online, you will find a plethora of options, each with its own unique approach and complexity.
So I am going to make this task easier for you by providing a step-by-step guide to creating a simple top-down game using Unity. This tutorial will cover the basics of Unity, creating game objects, and adding scripts to control player input.
By the end of this tutorial series, you will have a basic understanding of how to create a game in Unity and be able to build upon this foundation to create more complex games in the future.
So, we are not making the next smash hit, massive multiplayer, online game with millions of happy players ready to hand you hundreds of dollars per month!
Instead, we’re going to make a simple 2-D top-down game that includes the basic items you need for any video game.
- A Start Game Menu Screen
- A Game Over Screen
- A Pause Menu Screen
- A Player Character
- A Ghost Character
- Simple Collision Detection
- Top-Down Movement
- Simple Scoring System
- High Score System
- Background Music
- Simple Sound Effects
- Enemy Logic
- And much more!
Game Info
This is the game will be building.
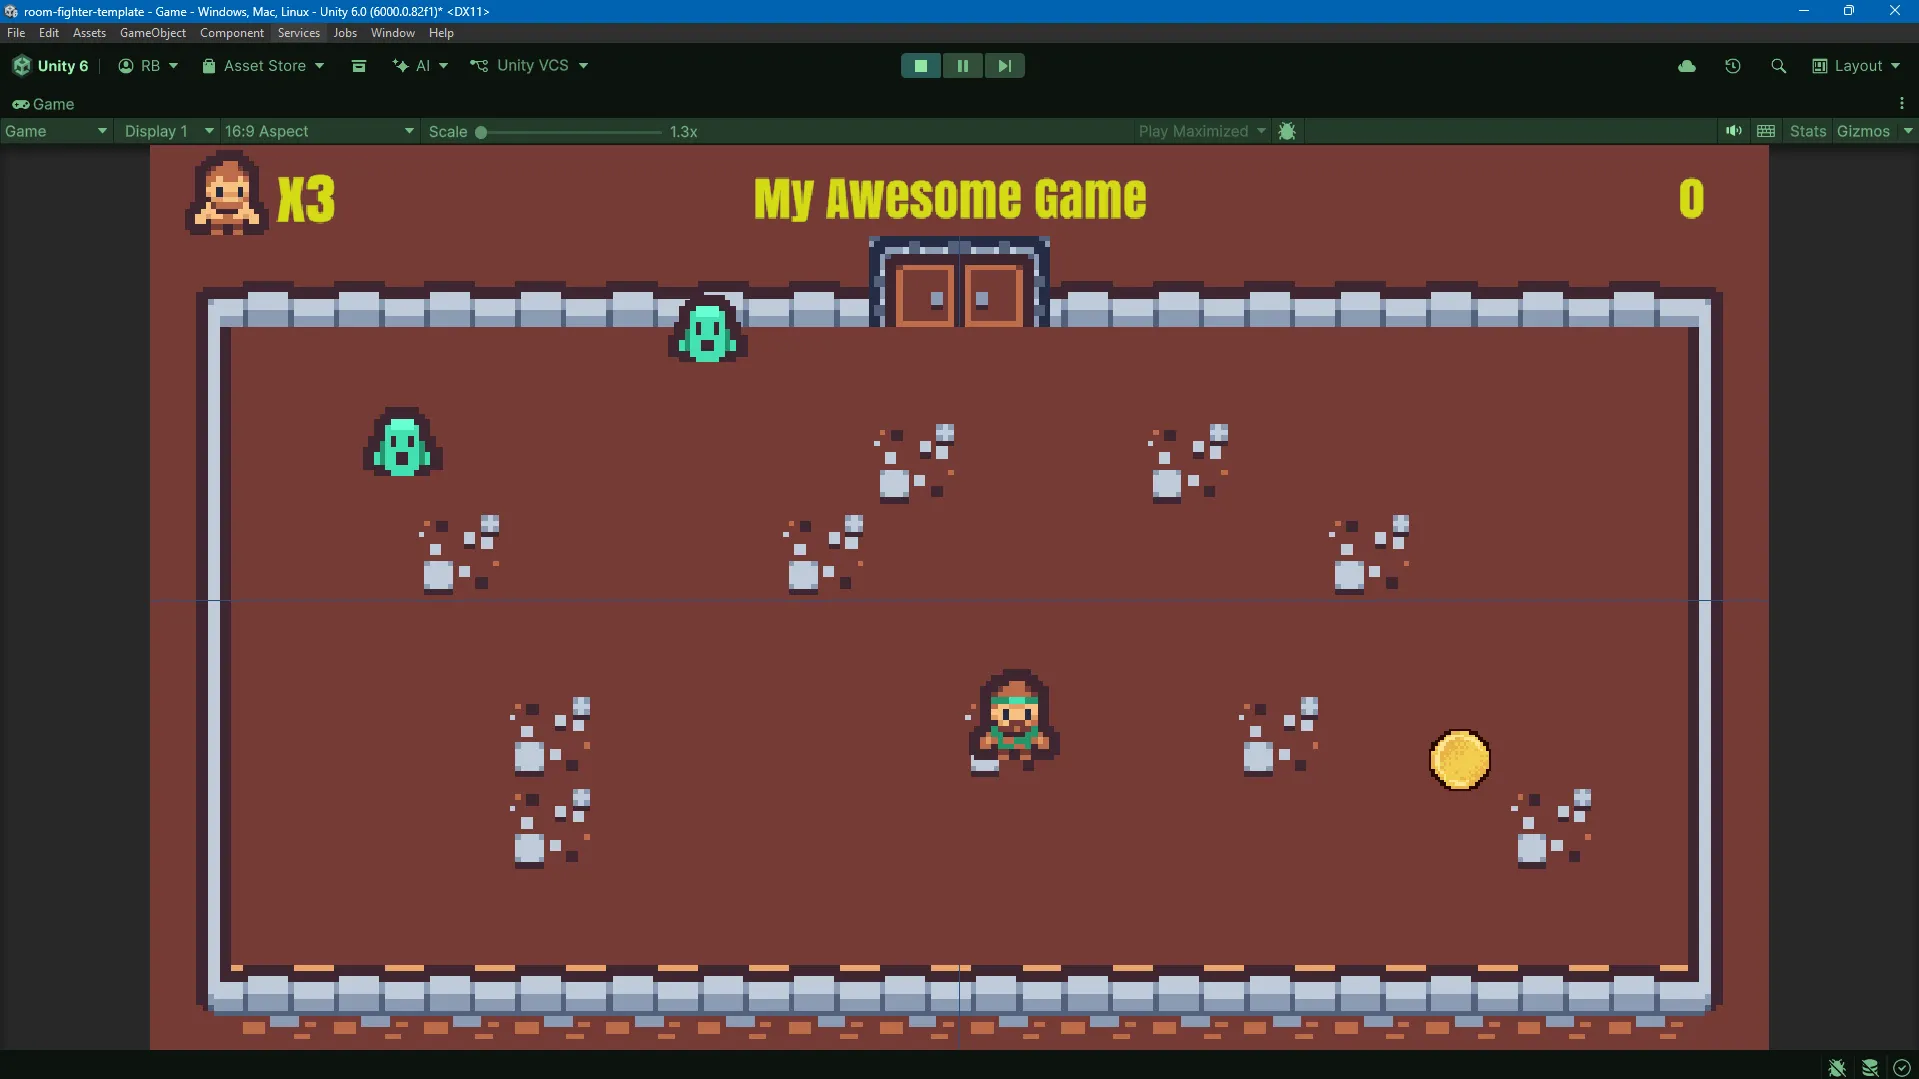
This is a simple top-down game where the player must collect coins and stay alive as long as possible. I designed it to demonstrate some of the basic features of Unity and how to use them.
We have a full game loop, a start, pause, and end screen. There is collision logic and a simple enemy AI. So it has all the things you need in a video game, but I have tried to keep things as beginner-friendly as possible.
Who is this game tutorial series for?
- Beginners with no prior Unity or game engine experience.
- No prior programming experience is expected. You’ll learn the C# and Unity concepts necessary to build this game.
- Any code editor works, that said Visual Studio, Visual Studio Code, and Rider are officially supported by Unity.
Series Design
We’re using the New Input System and specifically the Player Input component for input handling. If you’re new to Unity, the Player Input component is a powerful and flexible system.
YouTube episodes will generally target 15–20 minutes, but this isn’t a race. If a concept needs more explanation, we’ll take the time to explain it rather than rushing through it just to hit a particular video length.
This series assumes you can install Unity and an appropriate code editor. On Windows, Unity requires Visual Studio to be installed, but you can use Visual Studio Code or Rider instead. We won’t spend an episode walking through software installation.
When a topic requires more explanation than makes sense in the middle of the project, I’ll link to separate reference material where appropriate.
A promise about the code
Sometimes I’ll write something the way you’ve probably seen it in other tutorials, then come back and improve it when there is a practical reason.
Sometimes there will be a more advanced way to do things, but I’ll show you the simpler way first. Or I may just show the simpler way when the more advanced way requires a lot of hard to understand, advanced code without significant benefit.
My main goal is to make the code easy to understand and follow, and to show you how to write code that is easy to understand and follow.
When the more advanced way is shown, I’ll explain why it is better.
We won’t be writing code we know is inefficient just to show off or make some kind of point. We want to show you realistic project development, but we also want to honor your time.
Real development involves learning, revisiting decisions, and improving code.
Game Setup
This project was developed using Unity version 6.6. It should be compatible with Unity version 6.6 and later, including the LTS version of Unity 6.7 when it arrives.
I am using the 2D-URP template. Note I am not using the legacy Built-In Render Template if you’re coming from an older version of Unity.
Game Design
The game starts with the player locked in a room. The player must collect coins and stay alive as long as possible.
Enemies
Enemy ghosts patrol the room when spawned. Initially, they head in the direction of the player. This direction is a snapshot of the player’s position at the time the snapshot is taken.
Because these are ghosts, they are not bound to the dungeon walls like the player is. If a ghost goes off-screen, it is destroyed to keep the number of enemies down.
Scoring
As the player picks up coins, points are added to the player’s score. We will add a High Score to the game.
Player Health and Combat
The player starts with three lives. Any contact with a ghost kills the player and the round is over. If the player loses all of their lives, the game ends. The player’s high score will be saved as a way to teach simple saving using Unity’s PlayerPrefs class.
After N seconds (this can be modified to make the ghosts more challenging), if they have not hit the player, they change direction and take a new snapshot of wherever the player is.
Because these are ghosts, they are not bound to the dungeon walls like the player is. If a ghost goes off-screen, it is destroyed to keep the number of enemies down.
We will add a brief period of invincibility to the player so that spawning ghosts do not immediately kill the player at the start of the round.
We will also turn off the ghost’s collision detection for a brief period of time so that spawning ghosts do not immediately kill the player.
Source Control
The game will be saved to a public GitHub repository. Each post will have an appropriate Git tag for ease of review. That said, integrating Git itself into the workflow is beyond the scope of the series.
Balancing
No balancing is planned for the demo. We will consider adding a mechanic where the level becomes faster after a set number of points. In the end, any expansions will be up to you.
Publishing
The game will be published to Itch.io as a web build, so we can walk through the process of publishing a simple game there.
Future Expansion
The game is intended to be an MVP (minimum viable product). After the series, we will allow viewers on the YouTube channel to comment and suggest simple additions to the game.
Note; to prevent spam, I don’t accept comments on this blog site, please use the YouTube channel for comments.
If there is time, we may expand the game on the channel using the most popular suggestions, if any.
Assets and Credits
Third-party assets in this project are released under CC0 1.0 Universal, so no attribution is required. All assets used will include a README file in the asset source folder with a link to where it was obtained and the asset license terms. If there are any exceptions to this, it will be noted with the individual asset(s)
License
The code in this project is licensed under the MIT License. See the LICENSE file for details. All third-party assets are released under CC0 1.0 Universal or marked otherwise where applicable.