Your First Game in Unity: Ghost Evader: Part 06: Enemy Setup
Hey everyone, welcome to the next step in the setup for our game, Ghost Evader. This is a simple 2D top-down game where the player must collect coins and stay alive as long as possible. In this series we are going to go step by step and explain everything as clearly as we can.
In this post we are going to set up the enemy sprite and simple targeting logic.
Enemy Sprite
Setting up the enemy sprite will be very similar to setting up the player sprite. If you review the sprite sheet we set up in the previous post, the ghost sprite is tilemap_packed_108
You can drag the sprite from the project window into the Unity hierarchy window, and Unity will automatically create a sprite for it.
For now place the enemy somewhere on the screen, away from the player.
Next, add a Rigidbody2D component and set it similar to the player.
- Gravity Set to Zero
- Angular/Linear Damping Set to Zero
- Set Constraints to Freeze on the Z axis.
- Add a
BoxCollider2Dcomponent, setIs TriggertoTrue.
Now we’re ready to script the targeting logic.
Sprite Layers
To ensure everything displays properly, let’s talk briefly about the Sprite Ordering Layers.
You may notice when adding the Enemy sprite that it does not show up in front of the floor. You may or may not be affected by this.
When images overlap, Unity needs to know which order to display them. Otherwise, the display order is random. We have the wall, floor, the player, and ghosts on the screen. Later, well be adding coins to pick up.
Given this, we will set up sorting layers to tell Unity what the priority order is.
There are a couple ways of setting this up, let’s go to Edit → Project Settings → Tags and Layers.
You will see some dropdowns, let’s pick the one for Sorting Layers.
This is the place where you can provide a sort order for Unity. Press the + button towards the bottom right. We’ll add tags for the following:
- Floor
- Walls
- Enemy
- Pickups
- Player
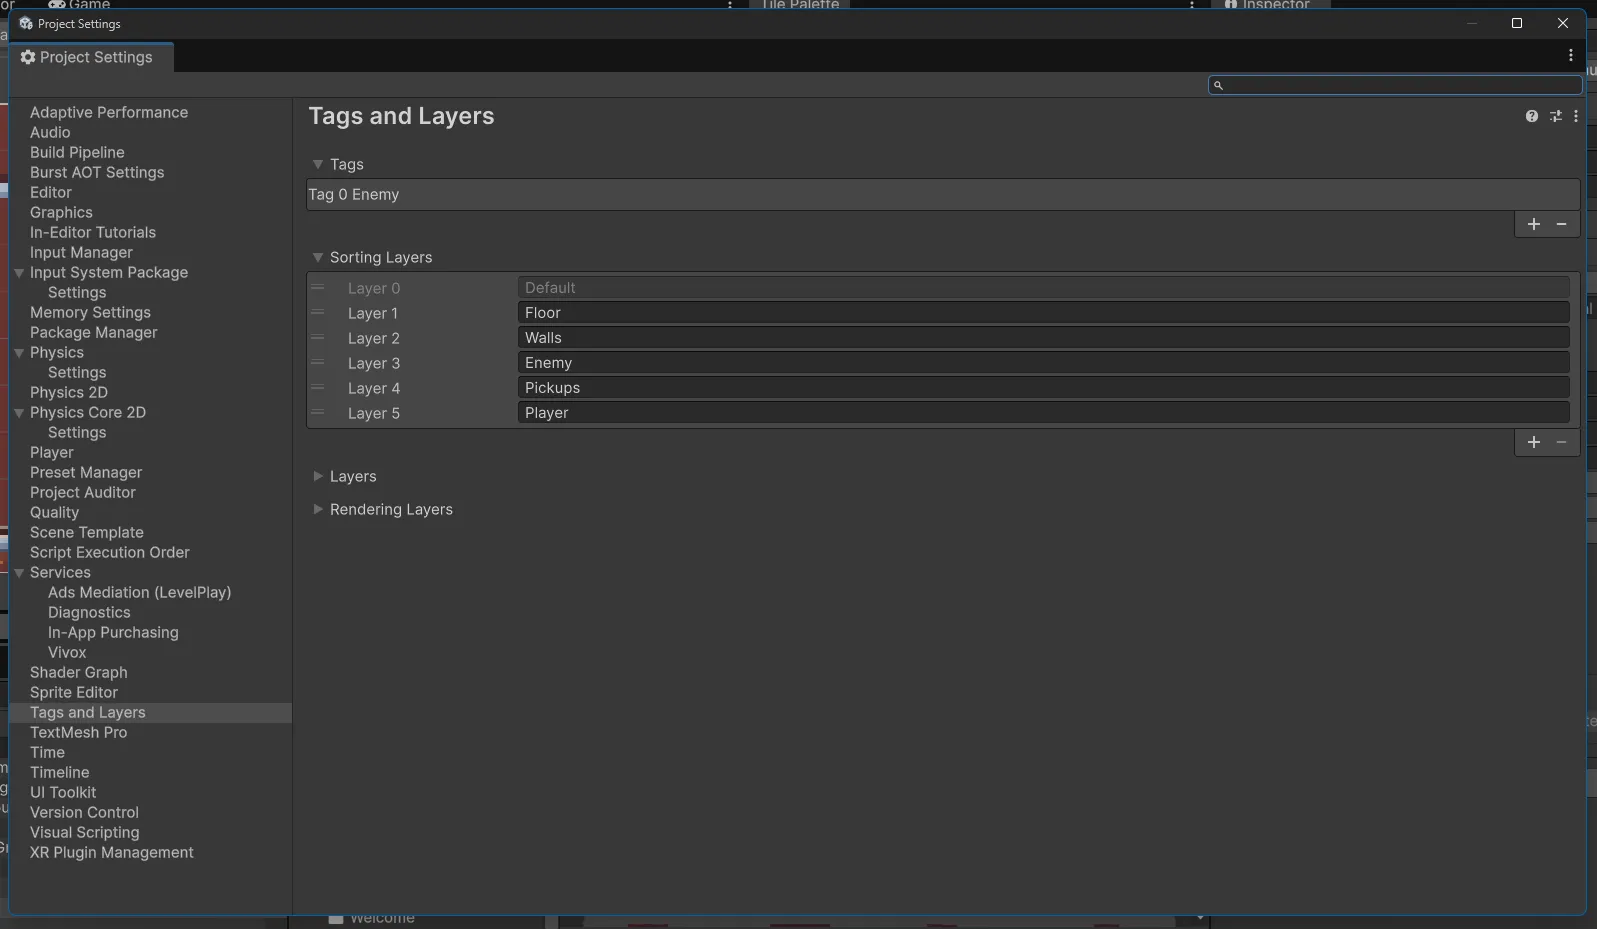
The order works from top to bottom, that is what is shown at the top is drawn first or at the bottom.
You’ll notice that there is a section for Tags and we have an Enemy tag. Tags are used to identify objects in the scene. We’ll use this to identify the enemy in our script.
Unity has a default Player tag. We’ll use this to identify the player in our script.
Enemy Script Setup
Now it’s time to add scripting to our Enemy. In the Project Window right-click and create a MonoBehaviour Script and call it Enemy.
Later we’ll create an EnemySpawner to create enemies, once we create an Enemy, what happens?
We want the enemy periodically to:
- Find the Player Game Object
- Proceed along this path for N seconds (we’ll set this in the Inspector)
- Change directions and head to the player based on the new direction.
If the enemy collides with the player, both the Player and the Enemy die.
If the Player dies, we wait a few seconds, then spawn a new round, or the game ends.
That’s it!
We have now planned out our game logic.
Internal Fields
The first thing we will need will be a way to set the enemy’s movement speed and how much time it spends until the next direction changes, so let’s add this:
// Editor Fields
[SerializeField] private float moveSpeed = 2f;
[SerializeField] private float timeBetweenDirectionChange = 1f;
Now we need access to the Rigidbody2D for movement control. We don’t need to call any functions on the player itself, but we do need to know where it is.
So we need a reference to the player GameObject.
Last, we need a counter that runs in between direction changes.
So this is how we set up our internal variables:
 // Internal Fields
    private Rigidbody2D _enemyRigidbody;
    private Player _playerScript;
    private float _timeToNextDirectionChange;
Getting a reference to the Player
First, let’s get a reference to the Rigidbody2D component that is attached to the enemy game object.
private void Awake()
{
    _enemyRigidbody = GetComponent<Rigidbody2D>();
}
Unity has a default Player tag. We could use this to identify the player in our script. I set the player game object to use the Player tag earlier.
Using the Tag property of the GameObject is a widespread way to identify game objects in Unity. You will see this method used in many beginner Unity tutorials.
However, tags are string-based and can be easily changed by mistake. You could remove the tag by accident in the Inspector. Or mystyped in your code.
So we will use the Player component we set up on the game object instead. This is a more reliable way to identify the player and avoids potential issues with tags.
The place for this is in the Start function. We will call this function once when the enemy is spawned.
private void Start()
{
    // The player should always exist during gameplay
    _player = FindFirstObjectByType<Player>();
}
You may ask, what happens if there is no player in the scene? For example, the player dies and the enemy spawner creates a new enemy? We will handle that when we set the enemy’s direction.
Now that the enemy has been created, we’re ready for our targeting logic, we’ll handle that during the Update() function.
Update Logic and Finding the Player
The core of the Enemy’s targeting and movement is in the Update function. This function is called every frame. We will use this to find the player and move towards them.
When Update starts, we need to know if it is time to find the player. The answer will be yes on the first frame, so we need to check that first.
So if the _timeToNextDirectionChange; is zero or less than zero, we need to find the player. When the enemy is created, _timeToNextDirectionChange will be zero, so we need to find the player.
private void Update()
    {
        // The first time this runs _timeToNextDirectionChange will be set to less than zero
        _timeToNextDirectionChange -= Time.deltaTime;

        // This will be false on the first frame
        if (_timeToNextDirectionChange > 0f)
        {
            return;
        }

        // This will execute on the first frame and then set the countdown timer
        FindPlayer();
        _timeToNextDirectionChange = timeBetweenDirectionChange;
    }
We haven’t written the FindPlayer function yet, let’s create it now, but we’ll add the logic inside later. Let’s just log Debug.Log("Looking for the player");
private void FindPlayer()
{
    // Add find logic here
    Debug.Log("Looking for the player");
}
Reviewing the Update Function
The Update function is where the Enemy’s logic is executed every frame. It’s a good place to find the player and move towards them.
The first thing we need to do is check if it’s time to find the player. If _timeToNextDirectionChange is zero or less than zero, it’s time to find the player. When the enemy is created, _timeToNextDirectionChange will be zero, so we need to find the player.
_timeToNextDirectionChange -= Time.deltaTime;This will be false on the first frame. It subtracts Time.deltaTime from _timeToNextDirectionChange every frame.
Time.deltaTime is the time in seconds it took to complete the last frame. This is calculated by Unity and can be read each frame.
Our logic design is that if the _timeToNextDirectionChange is greater than zero, it’s not time to find the player yet. If _timeToNextDirectionChange is less than or equal to zero, it’s time to find the player.
FindPlayer(); is a function that we will write to contain the logic to find the player.
Last, if the timer has expired, we need to reset the timer so that we can find the player again.
_timeToNextDirectionChange = timeBetweenDirectionChange;Testing the Find Logic
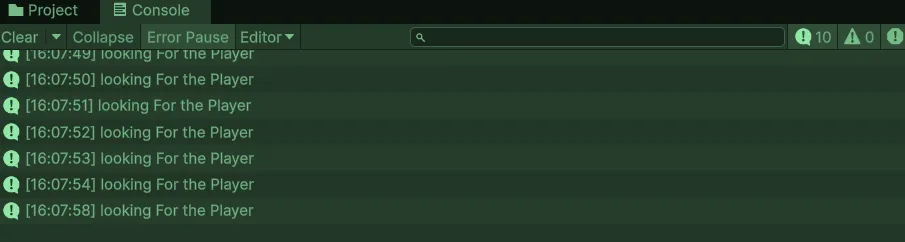
Let’s test the find logic by adding a Debug.Log statement to the FindPlayer function. This will print a message to the console every time the FindPlayer function is called.
We set this to 1 in our sample code, so the Debug.Log statement will print a message to the console every second.
When you test the game, you should see a message in the console every second. If you don’t see a message, check that you have added the Debug.Log statement to the FindPlayer function.
Also ensure that the [SerializeField] private float timeBetweenDirectionChange = 1f; is properly reflected in the inspector.
When you press play, your console should display a message every second like this:
Finding the Player
Now that we have the logic to find the player, we need to implement the FindPlayer function. This function will contain the logic to find the player.
private void FindPlayer()
    {
        if (_playerScript == null)
        {
            Destroy(gameObject);
            return;
        }

        Vector2 playerPosition = _playerScript.transform.position;
        Vector2 currentPosition = transform.position;
        Vector2 directionToPlayer = (playerPosition - currentPosition).normalized;

        _enemyRigidbody.linearVelocity = directionToPlayer * moveSpeed;
    }
Let’s walk through this.
if (_playerScript == null)
{
            Destroy(gameObject);
            return;
 }
First, we check if the _playerScript is null. If it is, we destroy the game object and return from the function.
Note: If the player is not found, the enemy will be destroyed. This is to prevent the enemy from moving towards a non-existent player. This is also a design choice to destroy all enemies if the player dies.
If you choose to modify this behavior, that is immediately destroying the enemy, you will need to modify the logic here.
Vector2 playerPosition = _playerScript.transform.position;
Vector2 currentPosition = transform.position;
Vector2 directionToPlayer = (playerPosition - currentPosition).normalized;
Here we need to find the player’s position. Next we create a variable to represent the current position of the enemy.
Finally, we calculate the direction to the player by subtracting the current position from the player’s position and normalizing the result.
This gives us a vector that points from the enemy to the player. We need to divide the direction vector by its magnitude or length to get a unit vector. This gives us a direction vector that has a length of 1.
There will be a separate post to talk about vectors and how they are used in Unity.
Enemies Going Offscreen
If the enemy goes offscreen, we want to destroy it. This is to prevent the enemy from moving offscreen and causing issues with the game.
Unity provides a built-in function to check if an object is offscreen. We can use this function to check if the enemy is offscreen and destroy it if it is.
private void OnBecameInvisible()
{
    Destroy(gameObject);
}
Unit calls OnBecameInvisible() via the SpriteRenderer anytime the sprite is no longer being rendered to the scene.
This is called on the game object the enemy is attached to. So you can’t place the sprite on a child object.
Note this can be called in a variety of scenarios in addition to going offscreen. For example, if the enemy is destroyed by a bullet or if the enemy is disabled by a power-up. So you should be careful when using this function. If you have other objects in the game that have a reference to this game object, you need to check when this function is being called.
Conclusion
This is our final script for the Enemy:
using UnityEngine;

public class Enemy : MonoBehaviour
{
    // Editor Fields
    [SerializeField] private float moveSpeed = 2;
    [SerializeField] private float timeBetweenDirectionChange = 1;

    // Internal Fields
    private Rigidbody2D _enemyRigidbody;
    private Player _playerScript;
    private float _timeToNextDirectionChange;

    // Unity Events
    private void Awake()
    {
        _enemyRigidbody = GetComponent<Rigidbody2D>();
    }

    private void Start()
    {
        _playerScript = FindAnyObjectByType<Player>();
        _timeToNextDirectionChange = 0;
    }

    private void Update()
    {
        _timeToNextDirectionChange -= Time.deltaTime;

        if (_timeToNextDirectionChange > 0)
        {
            return;
        }

        FindPlayer();
        _timeToNextDirectionChange = timeBetweenDirectionChange;
    }

    private void OnBecameInvisible()
    {
        Destroy(gameObject);
    }

    // Internal Functions
    private void FindPlayer()
    {
        if (_playerScript == null)
        {
            Destroy(gameObject);
            return;
        }

        Vector2 playerPosition = _playerScript.transform.position;
        Vector2 currentPosition = transform.position;
        Vector2 directionToPlayer = (playerPosition - currentPosition).normalized;

        _enemyRigidbody.linearVelocity = directionToPlayer * moveSpeed;
    }
}
In this post we created the enemy, its targeting logic, and how to handle when the enemy goes offscreen.