Your First Game in Unity: Ghost Evader: Part 03: Game Input
Hey everyone, welcome to the next step in the setup for our game, Ghost Evader. This is a simple 2D top-down game where the player must collect coins and stay alive as long as possible. In this series we are going to go step by step and explain everything as clearly as we can.
In this post we are going to set up and write the code for the GameInput.
I have covered much of what we are going to discuss in other posts, but for the benefit of a step by guide we will walk through this here.
What is the purpose of the GameInput Class
We want to keep the input for the game separate from the player and separate from other things going on in the world. This concept is called separation of concerns in the programming world. When we are working with our codebase, we want to create many small systems, each system with a discrete task. This makes our code base easier to grow (scale) and easier to maintain.
For example, what if we put all the input code on the player? This is a single-player game, right?
So what happens if your code disables or destroys the player when he dies, and you try hitting Escape for a menu? Maybe your code for the player handles that, but if you just destroyed or disabled the player, what happens? Most of the time for a simple case like this you may have some other system, like a game over screen, take over, but hopefully you see the point of the potential conflict.
Setting Up For Move Input
Previously we set up the Player Input Component and an Input Actions asset. Now it’s time to create the script and get our input to work.
We also talked about Game Objects in Unity, the basic building blocks for our game scene. By themselves, Game Objects have limited functionality. We need to write code to make our scenes come to life.
In Unity, we write scripts using the C# (pronounced ‘C sharp’) programming language. Unity has a mechanism called Mono Behaviors that ties those scripts to the Game Objects we create in the editor. You don’t need to be a programming expert to get started. Once you understand the basics, you can be very efficient as a designer/developer.
We can place our scripts anywhere in the Assets folder, that said the overwhelming number of developers will place all of their scripting code in a directory called Scripts. Let’s create that folder.
Once we create the folder, we need an actual C# script. For convenience, we’ll call that script GameInput. This will create a class of a matching name. It’s crucial in Unity that the filename of the script matches the class created in the script file. So be careful, if you have any mismatches, the script will not work.
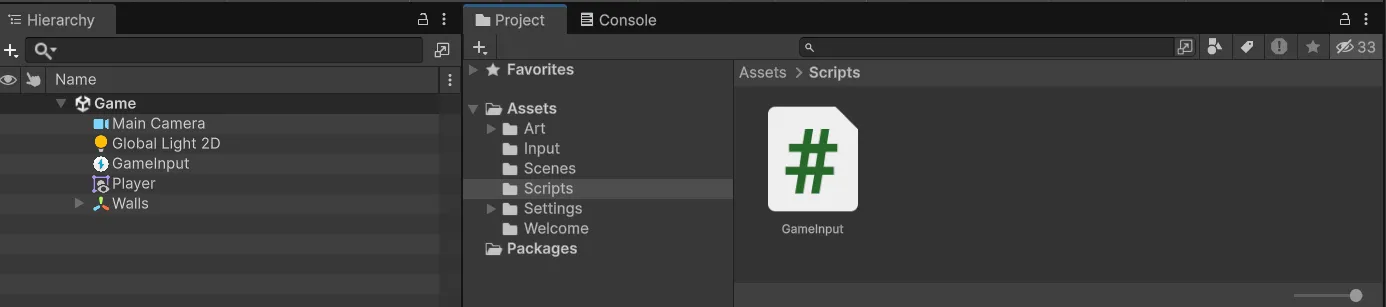
Declaring The Input Action System
Next, we need to declare that we intend to use the Input Action System. This is the system that will handle our input. We’ll do this by adding the following code to the GameInput script:
using UnityEngine.InputSystem;Now let’s remove the boilerplate Unity code, so we are left with just the GameInput class declaration.
This is the script that we are starting with.
using UnityEngine;
using UnityEngine.InputSystem;

public class GameInput : MonoBehaviour
{

}
Setting up the movement Vector
For this game, the first Input Action we are concerned with is player movement.
In the Input Actions asset the Move action should be configured as a Value action with a Vector2 control type.
The keyboard bindings are represented using a 2D Vector Composite.
Conceptually, that gives us this:
W       → ( 0,  1)
S       → ( 0, -1)
A       → (-1,  0)
D       → ( 1,  0)
Instead of receiving four separate button presses in our movement script, the Input System combines them into one Vector2.
A Vector2 is simply a value containing two numbers:
(x, y)For movement, we can think of those numbers as horizontal and vertical direction.
For example:
(1, 0)it means move to the right.
(-1, 0)it means move to the left.
And:
(0, 1)it means move in an upward direction.
The useful thing about this is that we can represent both direction and input with the same type.
Pressing W gives us an upward vector. Pressing D gives us a rightward vector. Pressing both gives us a diagonal vector.
Now for our movement script, we need to create a Vector2 to represent the direction we want to move.
We will call this variable, MovementVector.
The important thing to note is that this variable will be a reference to the Vector2 that the Input System creates.
Additionally, this variable needs to be public, and it also needs to be read-only. We don’t want other scripts to be able to change this value directly.
So we’ll create what’s called a property like this.
public Vector2 MoveInput { get; private set; }A property is a special type of class member variable that allows you to control how you read and/or write to that variable.
Writing the Movement Script
We need to write the function that will handle the input and set the MovementVector property. The Input System has a particular format when it calls our code.
We will call the function OnMove. The reasoning is that ‘moving’ is an action or event, this on this is our response.
Here is the complete function signature.
public void OnMove(InputAction.CallbackContext context)
{
}
The parameter InputAction.CallbackContext represents the type of data the system is passing to us and context is the name of the variable we will give to that data.
In this scenario we want to read the Vector2 data and map it to our internal variable `MoveInput so we will write it this way
public void OnMove(InputAction.CallbackContext context)
{
    MoveInput = context.ReadValue<Vector2>();

    Debug.Log($"Move Input: {MoveInput}");
}
I’ve added a debug log to show the value of the MoveInput variable for testing to ensure that the input is being read correctly.
Connecting the PlayerInput class
Once we have the MoveInput vector function, we need to wire the function to the PlayerInput component.
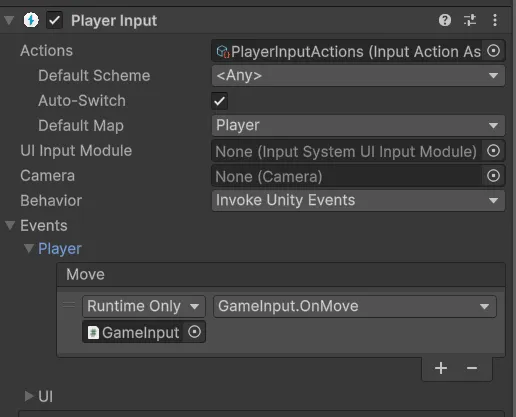
We’re now ready to test. In the editor run the project. If you hit any of the WASD keys or move the left analog stick on a gamepad you should see the Vector2 output in the console.
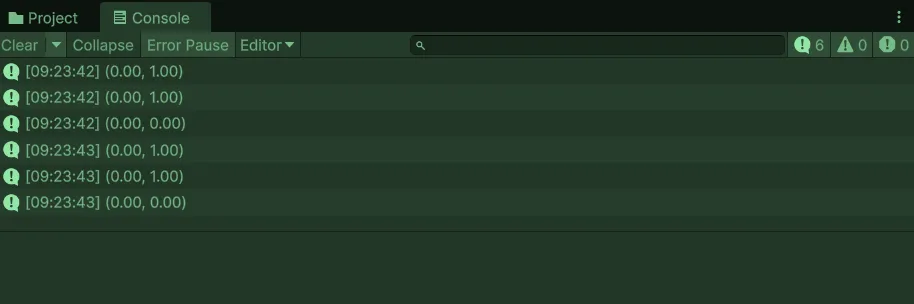
If you get output like this, it confirms our GameInput is wired correctly, and we’re ready to proceed.
Conclusion
Now that we have working GameInput let’s get our Player movement set up.