Your First Game in Unity: Ghost Evader: Part 04: Player Setup
Hey everyone, welcome to the next step in the setup for our game, Ghost Evader. This is a simple 2D top-down game where the player must collect coins and stay alive as long as possible. In this series we are going to go step by step and explain everything as clearly as we can.
In this post we are going to set up and write the code for the Player Character.
I have covered much of what we are going to discuss in other posts, but for the benefit of a step by guide we will walk through this here.
Player Design
In our game design the Player character simply moves along the screen. The player does not shoot, carry any inventory or weapons, a very simple design.
Based on this design, we will create a Player script that will handle the player’s movement. This script will be attached to the Player GameObject in the scene.
Sometimes in a more complex game we might need additional scripts to handle more complex player behavior, such as shooting, inventory management, or weapon switching.
For example, we might create a PlayerMovement script to handle the player’s movement, a PlayerInventory script to manage the player’s inventory, and a PlayerWeapon script to handle weapon switching.
However, for this simple game, we will focus solely on the player’s movement and place that code in a single class called Player.
Last, for this game we will be spawning the Player GameObject in the scene. When the player dies, we will destroy the player and let the game or level manager handle spawning a new player.
Player Components
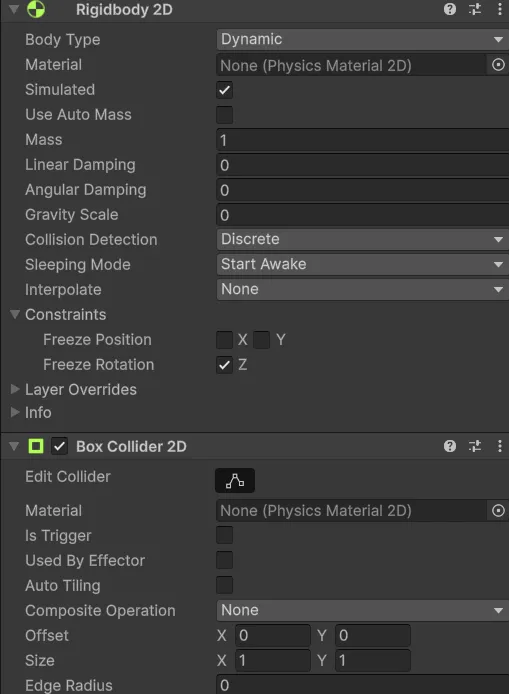
For the player we will need several components for our GameObject. We already have a SpriteRenderer to display our sprite. We are going to use the Unity Physics system for movement, so we need a Rigidbody2D and a Collider2D.
For the Rigidbody2D:
- Keep
Body TypeDynamic - Set
Gravity Scaleto zero - Set
Angular Dampingto zero - Set
Constraints→ Z - Freeze Rotation
Make sure to add a Collider2D in a shape that is closet to your sprite, leave the defaults as is, do NOT check Is Trigger otherwise your player will go through walls.
Adding Player Movement
The main task we want to achieve in this post is getting the player to move. Keep in mind that the input vector is on our GameInput object which is somewhere in the scene.
Declaring a Move Speed Variable
Since our player controls the movement itself, we need a variable to control the move speed.
Let’s tackle the move speed first.
By default, any data should be private so only the Player class can modify it. Then, if other systems need to know what the data is, we can expose it public for reading. That is what we did with our GameInput class. We know up front other classes need access to reading the input vector.
Not so with the Player class, at least not with the movement speed. We may want to adjust the speed, though, in the editor, so let’s set up the movement like this.
using UnityEngine;

public class Player : MonoBehaviour
{
    // Editor Fields
    [SerializeField] private float moveSpeed = 5f;
}
I have covered this concept before, in a lot of Unity tutorials you will see something like this instead :
using UnityEngine;

public class Player : MonoBehaviour
{
    // Editor Fields
    public float moveSpeed = 5f;
}
What’s the difference?
First, both formats will expose the moveSpeed variable to the Unity editor. In the first example when we keep moveSpeed from being changed in other scripts. This is important as it greatly reduces the potential for bugs.
For example, if we make it public like in the second example, our Enemy code could theoretically change the moveSpeed, or the AudioManager or both. If you forget or lose track, you can easily have a bug where the player’s speed becomes unpredictable.
In the first example [SerializeField] is a C# attribute that allows the variable to be serialized and shown in the Unity editor. It is used to expose private fields to the editor, which is useful for debugging and tweaking values without having to modify the script directly.
This setup prevents other scripts from directly modifying the moveSpeed variable, but it still allows the variable to be changed in the editor, which was the original goal.
Connecting the RigidBody 2D
Setting up access to the Rigidbody2D is very straightforward. See the code example below:
// Internal Fields
private Rigidbody2D playerRigidbody;

// Unity Events
private void Awake()
{
    playerRigidbody = GetComponent<Rigidbody2D>();

    if (playerRigidbody == null)
    {
        Debug.LogError("No Rigidbody attached!");
    }

}
If this is the first time seeing code like this, don’t worry. Let’s walk through this.
Rigidbody Declaration
private Rigidbody2D playerRigidbody;This is a variable declaration that sets up a reference to a Rigidbody2D that we will assign the name playerRigidbody.
Unity Awake()
private void Awake()
{
    // Code goes here
}
This is a function or block of code. In this case the function is private so only the Player class can call this. The term void means that the function does not send any data back. The last part Awake() is the name of the function. Inside the parentheses are empty. In this case the function is not expecting any data to be sent into the function. You may hear the term parameters or arguments used to describe the fact the data is being passed in.
One thing of note, in Unity the Awake() function will be called once when your game starts. This is where you can place code to initialize any internal data that the Player class will need.
Now for the code inside Awake() we have this:
playerRigidbody = GetComponent<Rigidbody2D>();

if (playerRigidbody == null)
{
    Debug.LogError("No Rigidbody attached!");
}
The first part is playerRigidbody = GetComponent<GameInput>();. This is a function call to Unity to get a reference to component, or in this case the Rigidbody2D attached to the same game object the script is attached to. If there is more than one Rigidbody2D attached we will get the first one.
If it finds a playerRigidbody this will be set to the memory location where it exists, otherwise it is set to null which means nothing or does not exist.
Unity also has a function to get all the components on the game object, but we will not discuss this here.
If Statements
The next part if (playerRigidbody == null) begins what is called an if statement. An if statement checks the expression inside the parentheses. The expression inside can be simple or complex.
If the expression evaluates to true then the code inside the curly braces will be executed. If the expression evaluates to false then the code inside the curly braces will not be executed.
In this case the expression is playerRigidbody == null. This expression is checking if the playerRigidbody variable is equal to null. This indicates whether Unity finds a Rigidbody2D or not.
The == is called the equality operator. It checks if the left side is equal to the right side.
If the variable playerRigidbody is null then the code inside the curly braces will be executed. If it is not null then the code inside the curly braces will not be executed.
Making sure the Rigidbody is connected
It is crucial to make sure that the Rigidbody2D component is connected to the Player game object. If it is not connected, the player will not be able to move or interact with the game world.
Typically, I will add if statement like this in Awake() to ensure that the Rigidbody2D component is connected before using it in the game logic.
I also set the Unity Editor to stop if the Rigidbody2D component is not connected to the Player game object.
This ensures that the player can move and interact with the game world.
Connecting to GameInput
Recall, the MoveInput input Vector2 is set on the GameInput game object. Now I want to discuss how to connect to the GameInput class. This is one way to do this :
    [SerializeField] private GameObject gameInput;

    private GameInput gameInputScript;

    private void Start()
    {
        gameInputScript = gameInput.GetComponent<GameInput>();
    }
This is very similar to the moveSpeed variable setup. Because our GameInput class inherits from MonoBehaviour it becomes a component just like the Rigidbody2D.
I need to explicitly reference the gameInput variable to ensure that the GameInput component is connected before using it in the game logic. Otherwise, calling GetComponent<GameInput>() will run on the script the game object is attached to, which is not what we want.
A shorter way to achieve the same thing is this:
[SerializeField] private GameInput gameInputScript;This method is more concise and easier to read. It directly assigns the GameInput component to the gameInputScript variable, eliminating the need for an additional GameObject reference.
In addition, Unity will enforce the connection of a game object that has a GameInput component attached to it.
Either way, we can call any public function on the gameInputScript variable and/or access any public variable.
Putting it all together
We have access to the MoveInput input Vector2 from the GameInput class, and the Rigidbody2D component on our Player game object. Now we can use this information to move the player around the screen.
There are two functions that Unity calls regularly during game execution: Update and FixedUpdate. The Update function is called every frame, while the FixedUpdate function is called at a fixed interval.
The general rule of thumb is that we perform any/all frame-based activity inUpdate. Any Physics-based code should go in FixedUpdate.
We will move the player during the FixedUpdate function Unity provides. This function is very similar to the Update function, but it is called at a fixed interval, which is useful for physics calculations.
Whenever we ask the Physics engine to move an object, we need to do it during the FixedUpdate function.
So let’s see what our code looks like:
private void FixedUpdate()
{
    _playerRigidbody.linearVelocity = gameInputScript.MoveInput * moveSpeed;
}
Let’s walk through this.
_playerRigidbody.linearVelocityThe linearVelocity variable controls the movement in the scene. The physics simulation will move the player based on the Vector2 it is set to. It will honor any colliders so the player will be stopped by walls. If you don’t set the Rigidbody2D to freeze on the Z axis, the player will rotate if you hit a wall.
gameInputScript.MoveInputThis is the MoveInput variable we set up on the GameInput object. We have gameInputScript that refers to the component and MoveInput is the variable we set up there.
We can easily multiply this by our moveSpeed variable. Feel free to adjust this to your liking.
Conclusion
Here is our completed script:
using UnityEngine;


public class Player : MonoBehaviour
{
    // Editor Field
    [SerializeField] private float moveSpeed = 5f;
    [SerializeField] private GameInput gameInputScript;

    // Internal Fields
    private Rigidbody2D _playerRigidbody;

    // Unity Events
    private void Awake()
    {
        _playerRigidbody = GetComponent<Rigidbody2D>();

        if (_playerRigidbody == null)
        {
            Debug.LogError("Player Rigidbody2D is null!");
        }

        if (gameInputScript == null)
        {
            Debug.LogError("Game Input  is null!");
        }

    }

    private void FixedUpdate()
    {
        _playerRigidbody.linearVelocity = gameInputScript.MoveInput * moveSpeed;
    }
}
We are ready to add a sprite, create our game environment, and bring this game to life.