How to Create a Simple Pause Screen in Unity 6
In the heat of the action, the phone rings; someone is at the door, as you can imagine, any number of things can happen that will require that your player pause the game.
Let’s explore how to create a simple pause screen in Unity 6!
Now, this is meant to be a simple pause screen, not a full game menu. We’ll cover that in the future.
Also, since this is a followup from my other post, we’ll keep the player responsible for pausing the game. In a larger game you may want to add a more complex pause menu, but for now, we’ll keep it simple.
What we’re starting with
We’re starting with a simple 2D player movement script that uses the Unity’s PlayerInput component that we ended up with in the last post. The Player game object has a PlayerInput component attached to it, which handles input for the player character and a Rigidbody2D for movement.
Rather than making the Player responsible for pausing the game, we’re going to give that responsibility to a Game Manager. We will add a GameInput script to manage game input in one place. We’ll also add a UI Manager to handle what the player sees.
Step 1 – Separate Input From Player Movement
So previously, we had the player movement input mapped directly to the player. Moving forward, we don’t want to lump everything on to our player game object. So let’s remove the input responsibility from the player game object and place it onto its own game object. For convenience, we’ll call this game object GameInput, very similar to what we had before. But in this case it’s very clear what GameInput is responsible for.
So this allows us to introduce a concept you may hear out there called ‘separation of concerns’. This means that the Player has separate responsibilities than what the game input is concerned with. Each part has one task and one task only in an ideal scenario.
Step 2 – Create the GameManager
So now we have game input, a player. Well, where do we control actually pausing the game? A lot of developers like to have a special class called a GameManager. We will make that class responsible for pausing the game.
First, let’s create our class :
public class GameManager : MonoBehaviour
{

}
We took out all the Unity boilerplate code to start fresh.
Next we’ll create a global variable to let other parts of our game know what the game state is:
public bool IsPaused { get; private set; }This form of setup uses a C# property. We will make the IsPaused variable public in terms of getting the value, but it is private in terms of setting it. This protects us from weird bugs or potential issues that could arise by simply making it public.
Controlling Time Using Time.Timescale
Unity does not have a single ‘Pause Game’ feature or function in the API. This is because pausing the game has many possible meanings. For example, should the music pause, animations or what should we pause exactly?
So Unity introduces the concept of the game’s timescale. By default, it is set to 1 which is the normal setting, and you can change it to any floating point number down to zero. Setting it will affect anything in the game that uses time, most notably Time.deltaTime. So you can create a ‘slow motion’ effect simply by changing this value. Conversely, you can set it to 2.0 or double speed. Note: Negative values are completely ignored.
Even though this seems simple, there are few things to consider for the many different scenarios your game may be in, so be sure to check out the documentation here.
So when the player hits the ESC or escape key (or similar gamepad key), we need a function to set the value accordingly. So this is our code.
public void TogglePause()
{
        IsPaused = !IsPaused;
        Time.timeScale = IsPaused ? 0f : 1f;
}
This will toggle the pause on or off depending on whatever the state was beforehand. This code looks a little complicated, so let’s break it down.
IsPaused = !IsPaused;Here we use the Not operator. So we say that the IsPaused value is the opposite of whatever it was. This is a widespread way to flip a bool without writing more complex code. It is the same as doing this :
 if (IsPaused == true) {
    IsPaused = false;
 } else {
    // IsPaused was already false so change it
    IsPaused = true;
 };
Next we have this :
Time.timeScale = IsPaused ? 0f : 1f;The ? symbol is called the Ternary operator. It is used to conditionally set a variable without writing a longer if/else code block. So the variable Time.timeScale is set depending on what the value of IsPaused is. This expression or variable you are checking needs to evaluate to either true or false (so you could have more complex logic if you want). If IsPaused is true, then Time.timeScale is set to 0f, otherwise it is set to 1f. This is another common pattern you will see.
Starting the Game
When we start the game, we want to make sure that we properly initialize the game state. The only variables we have are the IsPaused variable and the Unity Time.timeScale setting so let’s do that.
private void Start()
{
        IsPaused = false;
        Time.timeScale = 1;
}
Now, in this tutorial we don’t take any actions based on IsPaused but we have the structure in place if needed.
Implications of changing Time.timeScale
When you modify the Time.timeScale value, it affects how time passes in your Unity game. Setting Time.timeScale to 0f pauses the game, making time stand still. This is useful for creating pause screens or temporarily halting gameplay. Conversely, setting Time.timeScale to 1f resumes normal time progression, allowing the game to continue as usual.
This flexibility enables you to control the flow of time in your game, providing a seamless experience for players. You can set the value higher than 1.0f, for example, you can set it to 2.0f for double speed.
Update is still the same
Unity’s Update method is still called even when the game is paused. This is because Unity’s Update method is used for updating game logic and physics, which should continue to run even when the game is paused.
That said, any calls to Time.deltaTime will be affected by the Time.timeScale value. This means that any calculations based on Time.deltaTime will be affected by the Time.timeScale value.
For example, if you have a movement script that moves an object based on Time.deltaTime, the object will move slower or stopped entirely when the game is paused because Time.deltaTime will be 0f.
Fixed Update does not get called if Time.timeScale is set to 0f.
Unity’s FixedUpdate method is not called when Time.timeScale is set to 0f. This is because FixedUpdate is used for physics calculations and is called at a fixed interval, regardless of the game’s timescale.
So in our case we have the following code in our PlayerMovement.cs script :
private void FixedUpdate()
{
        playerRigidbody.linearVelocity = moveInput * moveSpeed;
}
So this effectively pauses the player’s movement when the game is paused.
The effect on Physics
According to Unity’s documentation, if you change Time.timeScale but not Time.fixedDeltaTime,
the physics simulation rate remains constant relative to in-game time but not real time. To keep
the physics simulation constant relative to real time instead, you can multiply
Time.fixedDeltaTime by the new timeScale. Usually the desired behavior is for the physics
simulation to remain consistent relative to in-game time, but some gameplay, audio syncing,
or effects logic might rely on a steady real-time fixed update rate.
That said, if your physics code is in FixedUpdate AND Time.timeScale is NOT zero, FixedUpdate will be called,
and you will need to multiply Time.fixedDeltaTime by the new timeScale to keep the physics
simulation constant relative to real time.
NOTE: For a beginner this is probably not something you need to worry about. If you are not sure what Time.fixedDeltaTime is, you can ignore this section.
Audio/UI are not affected by Time.timeScale.
Changing the Time.timeScale value does not affect the audio or UI elements in the game. You can directly pause the audio if you want, this is achieved by pausing the AudioListener component.
// Pause all audio
AudioListener.pause = true;

// Resume all audio
AudioListener.pause = false;
So what if we don’t want to use Time.deltaTime for frame rate control?
There are some scenarios where you are using some custom calculations that don’t rely on Time.deltaTime for frame rate control.
In those cases your custom code will still run regardless of the game’s timescale. In this case you need to write your own handler to deal with the player attempting to pause the game.
Unity also has the concept of Time.unscaledDeltaTime
Unity also has the concept of Time.unscaledDeltaTime, which is a fixed value that is used for calculations that don’t rely on Time.deltaTime for frame rate control. Time.unscaledDeltaTime is not affected by the Time.timeScale value.
For example, if you have a movement script that moves an object based on Time.unscaledDeltaTime, the object will move at a constant speed regardless of the game’s timescale. This is useful for something like an animation that needs to play at a constant speed regardless of the game’s timescale.
Step 3 – Create the GameInput Controller
We could map the input from our PlayerInput directly to the GameManager script, but this would couple the input handling to the game logic. Instead, we will create a new script called GameInput that will handle the input and pass it to the GameManager.
We don’t want the GameManager component responsible for handling any input. This adds a lot more complexity to the GameManager script and makes it harder to understand and maintain. By separating the input handling from the game logic, we can keep the GameManager script simple and focused on managing the game state.
Here is our GameInput script:
using UnityEngine;
using UnityEngine.InputSystem;

public class GameInput : MonoBehaviour
{
    [SerializeField] GameManager gameManager;

    public void OnPause(InputAction.CallbackContext context)
    {
        if (context.performed)
        {
            gameManager.TogglePause();
        }
    }
}
Let’s walk through this:
[SerializeField] GameManager gameManager;We set up a reference to the GameManager component so that we can call the TogglePause method on it when the pause button is pressed.
Note we don’t set it up to a Unity’s GameObject, we set it up to a GameManager component directly. This is because we want to call the TogglePause method on the GameManager component, not on the GameObject that the GameManager component is attached to.
This makes it easier to understand and maintain the code, as we don’t have to worry about the GameObject that the GameManager component is attached to.
Additionally, by using a direct reference to the GameManager component, Unity will only allow us to attach a GameObject that has a GameManager component attached. So this prevents attaching the wrong object.
We also get a reference directly to the GameManager instance which saves us from having to find the GameManager component on the GameObject that the GameInput script is attached to.
public void OnPause(InputAction.CallbackContext context)
{
        if (context.performed)
        {
            gameManager.TogglePause();
        }
}
This is our connection to the PlayerInput component. We do need to make sure we only activate the TogglePause() function when the action is performed. I will go into more detailed into what context.performed means and the different context values in a separate post.
NOTE: While this will work if you don’t process the context, but it’s not the best practice. In the video that is linked, I don’t check the context and the code does work. That said, the better way is to make sure we only toggle the screen on context.performed.
Step 4 – Attach the GameInput and GameManager components
I would recommend creating a new GameObject for each of these components. Be sure to attach the respective script to each GameObject. This will make it easier to understand and maintain the code, as we don’t have to worry about the GameObject that the GameManager component is attached to.
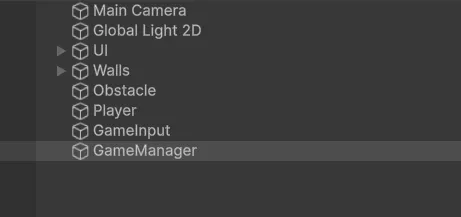
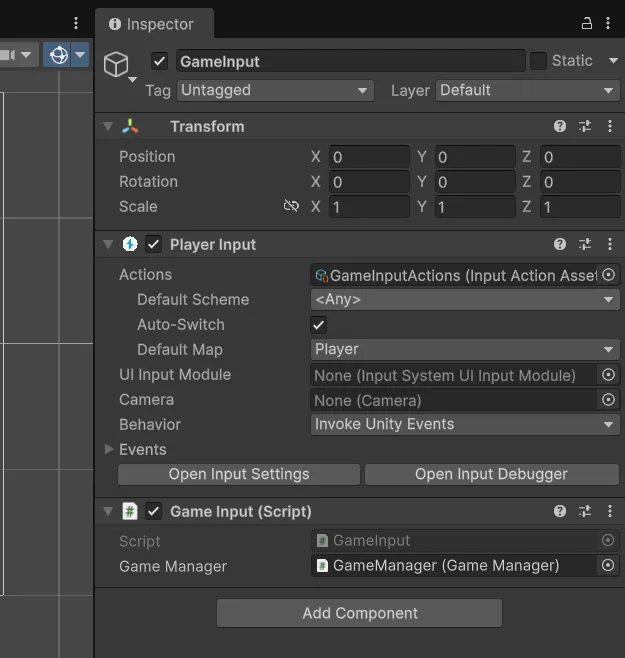
You will then need to attach the GameManager object to the GameInput object. This will allow the GameInput component to access the GameManager component and call its methods.
Step 5 – Configure the Input Actions Asset
You will need to configure the InputActions asset to support the Pause action. Unity does not define a default Pause action. See the attached image.
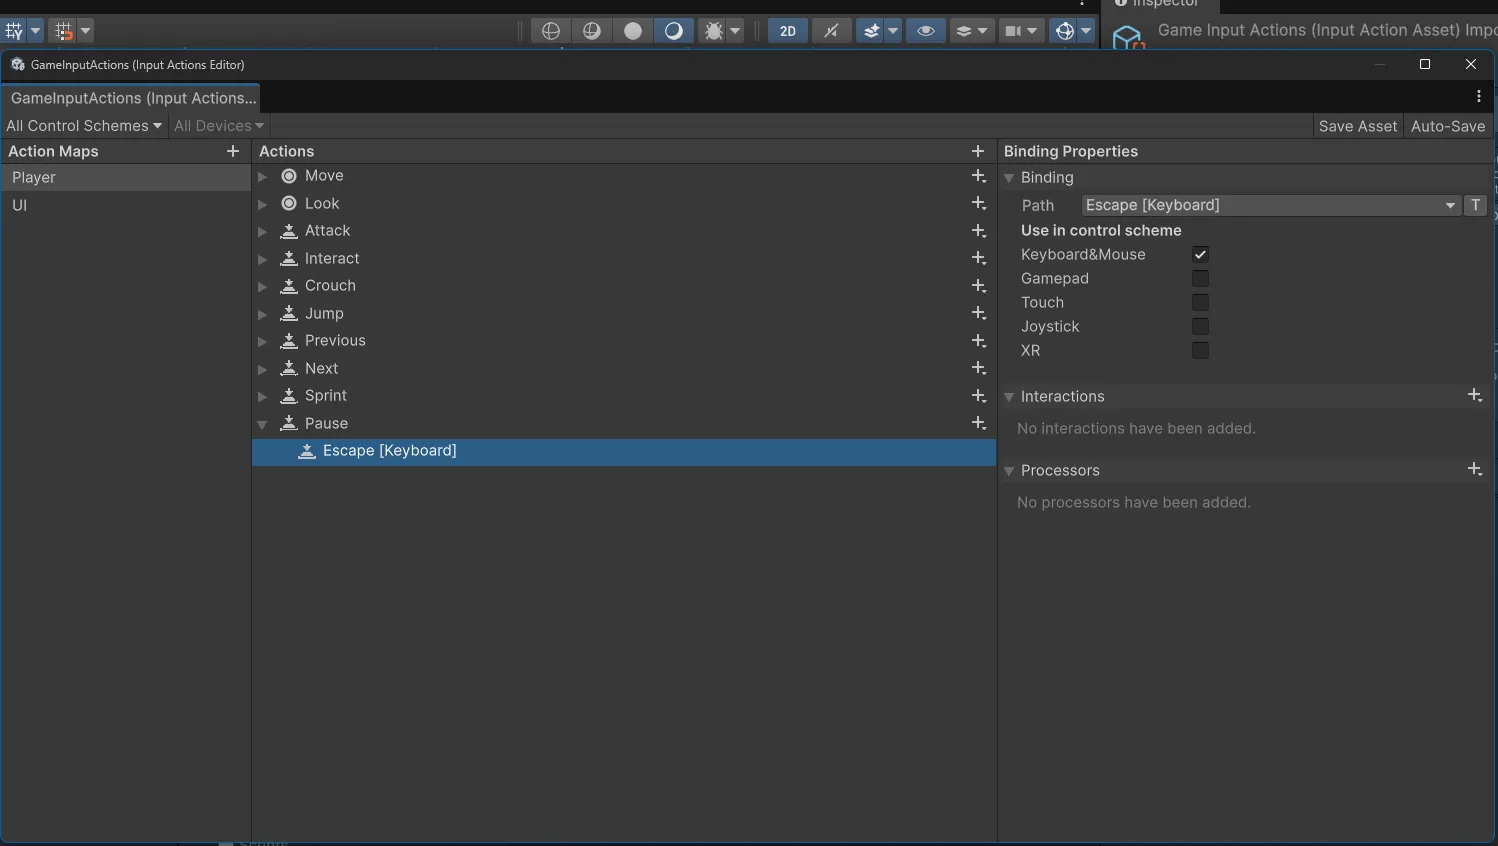
In the Player action asset you will need to:
- Create a new action by clicking the
+symbols on the top of theActionssection. - Came the action
Pause. There should be a space for a binding created (you can’t rename it). - Click the
new bindinglabel. - In the
Binding Propertiessection you will need to manually set the path to theESCkey. In theBy Location of Keydropdown. Also set theUse in control schemetoKeyboard/Mouse.
You will now need to wire the event from the PlayerInput component to our GameInput function we wrote earlier. See the attached image.
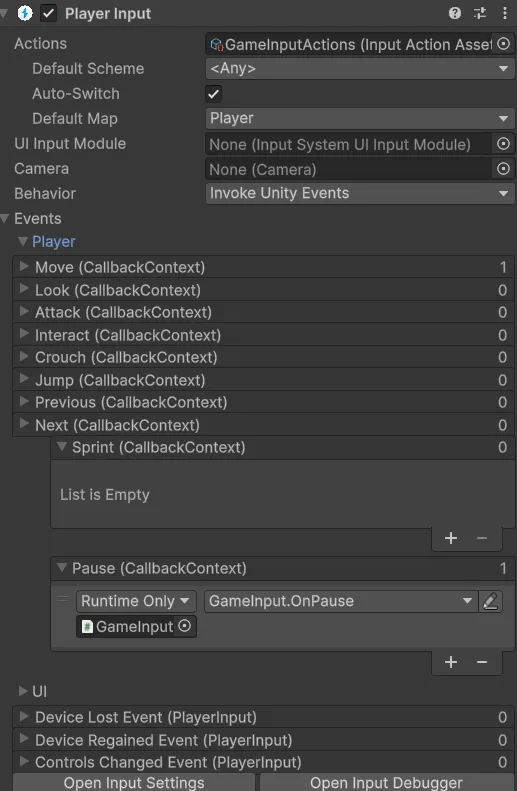
Once you have the event wired up, you can test the pause functionality by pressing the ESC key. The game should pause that is if you try moving, it will not work.
We need to create the UI to indicate that the game is paused. This will be a simple UI element that will be displayed when the game is paused. We will create this UI element in the next step.
Step 6 – Create the Pause UI
Now in this step all you need to do is create a UI element that will be displayed when the game is paused.
In the video I simply create a TextMeshPro text element that will be displayed when the game is paused. You can use whatever UI element you want.
Let’s create a simple script that will be responsible for displaying the pause UI.
using UnityEngine;
using TMPro;

public class UIManager : MonoBehaviour
{
    [SerializeField] private TextMeshProUGUI pauseText;

    private void Start()
    {
        DisplayPauseScreen(false);
    }


    public void DisplayPauseScreen(bool show)
    {
        pauseText.gameObject.SetActive(show);
    }

}
This is pretty straight forward. We are simply creating a script that will be responsible for displaying the pause UI. We are using the TextMeshProUGUI component to display the pause UI. We are using the SetActive method to display the pause UI.
Note we are starting with false in the Start method. This is because we want the pause UI to be hidden when the game starts. Some YouTube tutorials will disable it in the Editor. Personally, I prefer to do it this way and not worry about whether I have it disabled or not.
We need to attach this script to the UI element that we created in the previous step. I use a separate GameObject for this. This can be anywhere in the scene, make sure it is not attached to the text element itself.
Step 7 – Attach the GameManager and UIManager
Last, we need to attach the GameManager and UIManager scripts to the GameObject that we created in the previous step.
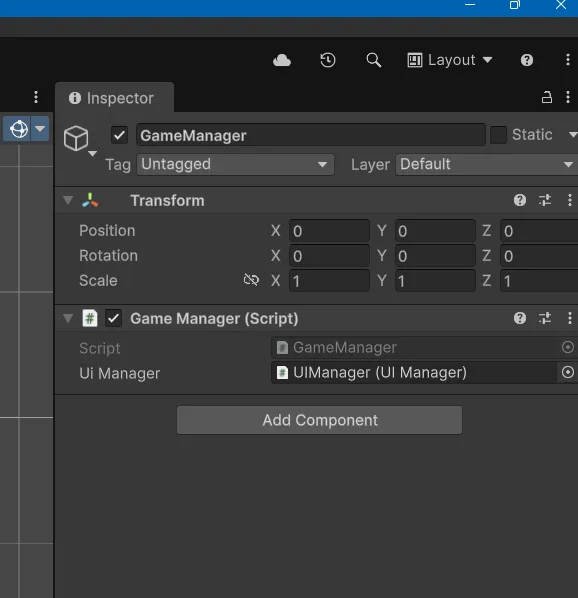
We need to adjust our GameManager to call the UIManager.
public void TogglePause()
{
    IsPaused = !IsPaused;
    Time.timeScale = IsPaused ? 0f : 1f;
    uiManager.DisplayPauseScreen(IsPaused);
}
Now we should have a working pause screen!
This is a simple pause screen. It is not very pretty, but it works. From here, you can add more features to the pause screen. You can add a resume button, a quit button, and more.
You now have the basics, if you need a quit button, you can add it and then have it sent to the UIManager script.
If you need the scripts in a downloadable format, you can check out my GitHub.
Let me know if you have any questions!